| c3bb Communications Corporation Broadband Wireless

The Basics of Email:
All email programs have the same function -- to connect with your service provider and download or upload messages. All email programs have a toolbar near the top with buttons on it that explain the actions associated with each one. Remember that the exact steps to perform certain functions will vary between programs.
What's Where:

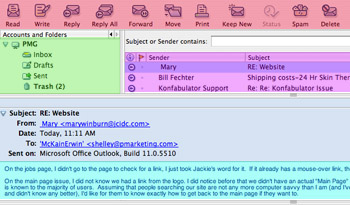
There are certain button features associated with all email programs that you should know what they are and what they do. These buttons appear in red in the example graphic.
- Read -- Click this button to read a selected email.
- Write (new message)-- Click this button to write a new email.
- Reply -- Click this button to reply to an email. You will reply to the email that you have selected in your inbox.
- Reply All -- Click this button when you have an email selected to reply to all recipients of the original message.
- Forward -- Click this button to forward the selected email message to other recipients of your choosing.
- Move -- Move the selected message to another email box or to the trash.
- Print -- Print the selected email message.
- Delete -- Delete the selected email message.
- Send and Receive -- Performs a send and receive of your email account at the current time without waiting for a scheduled send and receive pattern.
There are certain navigation features associated with all email programs that you should know what they are and what they do. These features are many times located in a separate frame and are shown as lime green in the example graphic.
- Inbox -- this is where your new email messages will appear and where they are stored.
- Address Book -- this is where you contacts are stored... it's just like a paper address book and will contain all the people that you add to it or that you email from the program.
- Drafts -- this is where your email messages are stored as you are composing them.
- Trash -- this is where you put all your unwanted messages. You can drag any unwanted message to the trash by clicking on it while holding down the mouse button and then dragging it to the trash icon.
Email Information Headers contain information about the email you have received. This area displays the subject of the email, the sender and the sender's address, as well as the date and time it was sent. These features are shown as light blue in the example graphic.
Email Body Text is the area in which your email message is displayed. This area is shown as tourquois in the example graphic.
Step by Step Instructions for Sending a New Email Message:
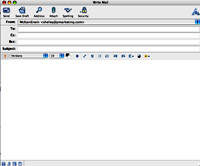
1. Click on the button called 'new message' or 'write'. A new box will open that looks similar to the graphic below:

2. TO:
This is the section of email that is like the outside of an envelope when sending a regular letter.
In the To: section type in the address of the person you'd like to send email to. This should take the format of username@theiraddress.com. Type the address carefully, as it will not be sent unless it is perfectly correct.
3. CC:
This allows you to send a carbon copy of your email to other recipients. Simply place the recipient's email address in the CC: box, as in the To: field. A copy of your email will be sent to that person.
4. BCC:
This field allows you to blind copy another recipient. Simply add email addresses in this box and others that receive your email won't be allowed to see what names appear here.
5. SUBJECT:
Type in a brief description of what your email is about. This isn't required, but will make it easier for those receiving your mail to sort it from other messages they have received.
6. SEND:
This is just like dropping your letter in the mail box. Once you hit this button, your email will be sent to all the recipients that you have entered into the TO field, the CC field and the BCC field.
Email Attachments:
Attachments are files that you want to send along with your email message. They can be documents, photos, spreadsheets or any other type of separate file.
To send an E-Mail attachment:
- Open and complete the email message as described above.
- Click the button that says 'Attach' or click the button that looks like a paperclip. This will open a new window for you to browse through your existing files to find the one you wish to attach.
- After finding the file that you wish to attach, left-click on the file. Click the 'Attach' button in the 'Attach File' dialog box. The file name will then appear in a separate line in your email header or as an icon at the bottom of your message in the text area field.
- Click on submit, thus sending your new email message and attachment to your intended recipients.
|


